


Implementing User Input with Read-Variable in SPE
The Sitecore PowerShell Extensions (SPE) module speeds up the delivery of Sitecore solutions by helping you automate tasks with interactive tools for your custom scripts.
In this section, I’ll share a very useful SPE command, Read-Variable, which is a powerful, yet simple way of adding user input to SPE scripts.
Basics
The Read-Variable function in SPE allows a user to input the necessary parameters in a customizable dialog box to run your script. (Check out the full Read-Variable documentation here.)
You can create one or more PowerShell hash tables to specify each of the parameters that you pass to the Read-Variable function:
$dialogParams = @{
    Title = "Dialog title"
    Description = "Description under title"
    OkButtonName = "Execute"
    CancelButtonName = "Close"
    Parameters = @(
        @{
            Name = "textField"
            Title = "Text Field"
        }
    )
}

$dialogResult = Read-Variable @dialogParams
If you run this code snippet in the PowerShell ISE, you will get the following dialog:
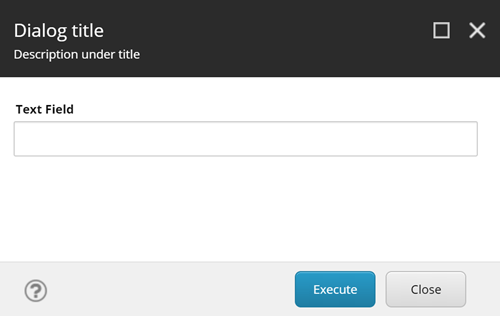
To determine if the user has pressed the "Ok" button ("Execute" in the example) or the "Cancel" button ("Close" in the example), just test the dialog result variable ($dialogResult in the example) to see if it equal to "ok":
if ($dialogResult -ne "ok") {
    Exit
}
To read the user input (which is the purpose of this mechanism), take note of each of the Parameters' "Name" value. For the example, we have a single Parameter named "textField". We refer to the entered value by using it like any other PowerShell variable. In this example we use $textField:
Write-Host "Value entered by user: " $textField
The return type of the Parameter will depend on the editor that you used for it. In this example, the editor is a simple text box, so you will get a string for $textField. If you use other editors like a droplist, you can get a Sitecore Item object, or an array of Items if using multi-list editors. We will talk about Parameter Editors in the next section.
Finally, you should always close the Script window after your script has finished running. Make sure to end your scripts with the following sentence:
Close-Window
This will ensure that the "Running script" dialog that appears when running a custom script from the Sitecore interface (outside of the PowerShell ISE) will automatically close.
How to define fields in the dialog box using Parameters in Read-Variable
Overview
As stated in the last section, the Read-Variable SPE function displays a dialog box where users can enter parameters through visual fields for your script. These fields are specified through the “Parameters” parameter in Read-Variable. Parameters is an array, so you can specify one or more fields for your dialog.
Text Parameters
Text parameters allow users to enter any text. You have two types of text parameters: single line and multiple line, as shown in the following example:
$dialogParams = @{
    Title = "Dialog title"
    Description = "Description under title"
    OkButtonName = "Execute"
    CancelButtonName = "Close"
    ShowHints = $true
    Parameters = @(
        @{
            Name = "singleLineText"
            Title = "Single Line Text"
            Placeholder = "This is a single line text field"
            Tooltip = "Tooltip for single line text"
        }
        @{
            Name ="multiLineText"
            Title = "Multiple Line Text"
            Lines = 3
            Placeholder = "This is a multiple line text field"
            Tooltip = "Tooltip for multiple line text"
        }
    )
}

$dialogResult = Read-Variable @dialogParams
If you run this snippet in PowerShell ISE, you will get the following dialog:
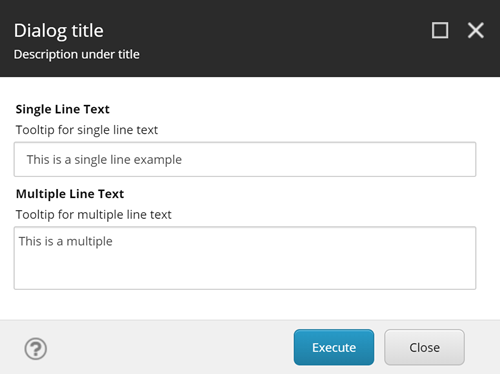
The only difference between the single-line and multi-line text fields is the “Lines” parameter. Assign it a number greater than 1 to get a multi-line field. The value returned in the variables for these fields ($singleLineText and $multiLineText in the example) is a string.
Dropdown List Parameters
Use dropdown list parameters when you need users to choose a single item in the Sitecore tree. There are two ways of doing this: using a pre-defined root element or using a droptree editor:
$dropDownSelector = Get-Item -Path "master:\content"

$dialogParams = @{
    Title = "Dialog title"
    Description = "Description under title"
    OkButtonName = "Execute"
    CancelButtonName = "Close"
    ShowHints = $true
    Parameters = @(
        @{
            Name = "dropDownSelector"
            Title = "Dropdown Selector"
            Root = "/sitecore/content/"
            Tooltip = "Enter item name or select from tree"
        }
        @{
            Name = "dropTreeSelector"
            Title = "Droptree Selector"
            Editor = "droptree"
            Source = "/sitecore/content"
            Tooltip = "Select from dropdown tree"
        }
    )
}

$dialogResult = Read-Variable @dialogParams
Executing this script in PowerShell ISE will show you the following window:
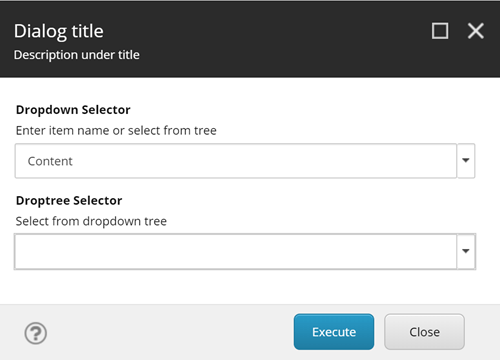
If you click on the first field’s down arrow, you will get a tree with the valid item selections. In the field definition, the “Root” parameter allows limiting the selections to a single branch of the tree:
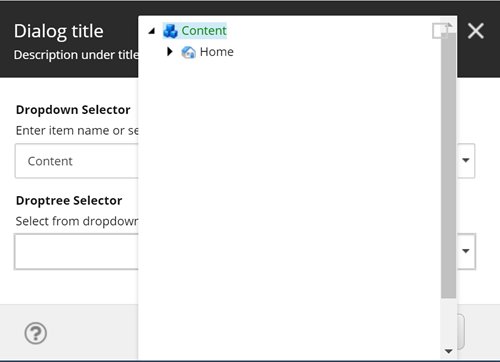
If you click on the second field’s down arrow, you will get a tree with the valid item selections. Note that the definition for this field uses the “Editor” parameter, and it is set to “droptree”. Also, it is optional for these fields to have a “Source” parameter, that allows you to limit the branch where the user can select items:
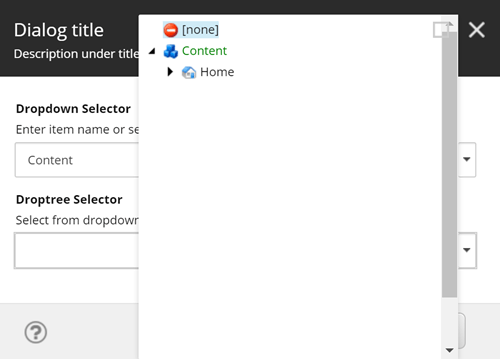
Also note that the droptree field includes the “[none]” option. The field is usually defaulted to this option, and appears blank in the field when selected. It is important to note this, because if[none] is selected, the returned value will be $null.
These fields return Sitecore.Data.Items.Item objects. That means that you can access the regular Item fields as you do in your .NET code, for example:
Write-Host "Selected in dropdown: " $dropDownSelector.DisplayName

# Test $dropTreeSelector for $null
if ($dropTreeSelector -ne $null) {
    Write-Host "Path of selected in droptree: " $dropTreeSelector.FullPath
}
Multi-list Parameters
Use multi-list parameters when you need users to choose one or more items from the Sitecore tree. You can use treelists or one-level multilists:
$dialogParams = @{
    Title = "Dialog title"
    Description = "Description under title"
    OkButtonName = "Execute"
    CancelButtonName = "Close"
    ShowHints = $true
    Parameters = @(
        @{
            Name = "treeListSelector"
            Title = "Treelist Selector"
            Editor = "treelist"
            Source = "DataSource=/sitecore/layout/Placeholder Settings&DatabaseName=master&IncludeTemplatesForDisplay=Placeholder"
            Tooltip = "Select one or more from tree"
        }
        @{
            Name = "multiListSelector"
            Title = "Multilist Selector"
            Editor = "multilist"
            Source = "DataSource=/sitecore/layout&DatabaseName=master"
            Tooltip = "Select one or more from list"
        }
    )
}

$dialogResult = Read-Variable @dialogParams
If you run this code snippet in PowerShell ISE, it will show something like this:
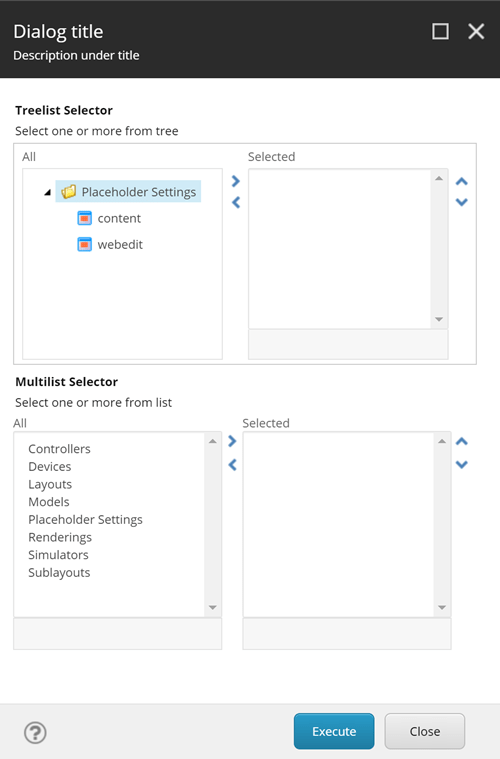
Both are differentiated only by the Editor parameter. Treelists have Editor set to “treelist”, and Multi-lists set to “multilist”. Both have a Source parameter, a string with several sub-parameters to customize and restrict the left list/tree. (You can find a reference for these sub-parameters in many blogs and the Sitecore Data Definition Cookbook.) When using sub-parameters, you MUST include the “DatabaseName” sub-parameter, otherwise you will get an error when trying to execute the script (i.e. press the OK button).
The value returned by these fields is an array of Sitecore.Data.Items.Item objects. If no items are selected by the user, these fields return an empty array. In the following example, it displays the number of items selected in each field, and it displays the name and full path of each item selected:
Write-Host "Selected items in treelist: " $treeListSelector.length
Write-Host "Selected items in multilist: " $multiListSelector.length

if ($treeListSelector.length -ge 1) {
    $treeListSelector | Select-Object DisplayName, FullPath
}

if ($multiListSelector.length -ge 1) {
    $multiListSelector | Select-Object DisplayName, FullPath
}
Checkboxes and radio buttons with fixed values
If you want to include extra custom options that can be selected by the user, you can use checkboxes and radio buttons.
$radioOptions = [ordered]@{
    "Option 1 This is option number 1" = 1
    "Option 2 This is option number 2" = 2
    "Option 3 This is option number 3" = 3
}

$checkListOptions = [ordered]@{
    "Checkbox 1" = 1
    "Checkbox 2" = 2
    "Checkbox 3" = 3
}

$dialogParams = @{
    Title = "Dialog title"
    Description = "Description under title"
    OkButtonName = "Execute"
    CancelButtonName = "Close"
    ShowHints = $true
    Parameters = @(
        @{
            Name = "radioSelector"
            Title = "Radio Button Selector"
            Editor = "radio"
            Options = $radioOptions
            Tooltip = "Select an option"
        }
        @{
            Name = "checkListSelector"
            Title = "Checklist Selector"
            Editor = "checklist"
            Options = $checkListOptions
            Tooltip = "Select one or more options"
        }
    )
}

$dialogResult = Read-Variable @dialogParams
The following dialog will appear if you run this code snippet in PowerShell ISE:
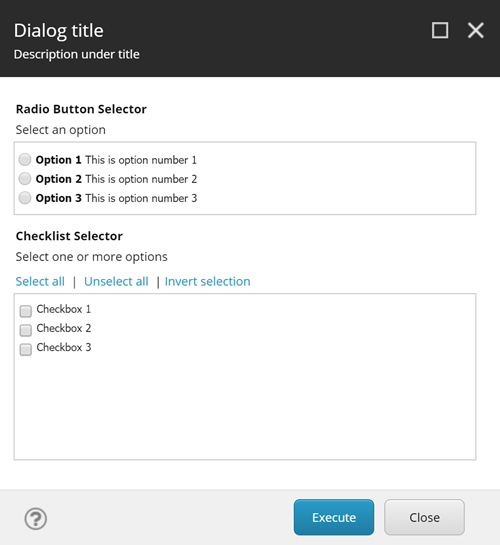
Fixed options are defined at the start of the script, using the $radioOptions and $checkListOptions ordered hash tables. For both types of fields, use the Options parameter to assign the options to the field. For radio buttons, you can use custom HTML formatting for the options (this won’t work for checkbox lists). Use the Editor “radio” for radio buttons, and “checklist” for checkbox list.
If you need to specify a default selected value, use the Value parameter set to the option value you want to select (option values are the numbers next to the equals = sign in the ordered hash tables). For example, if in the first field you want the second option to be preselected when opening the window, and in the second field you want the first and third options preselected, do something like this in the field definitions:
@{
    Name = "radioSelector"
    Title = "Radio Button Selector"
    Editor = "radio"
    Options = $radioOptions
    Value = 2
    Tooltip = "Select an option"
}
@{
    Name = "checkListSelector"
    Title = "Checklist Selector"
    Editor = "checklist"
    Options = $checkListOptions
    Value = @(1, 3)
    Tooltip = "Select one or more options"
}
The radio button list will return a single value or $null if not selected. The checkbox list will return an array of the selected values, or an empty array if none are selected:
if ($radioSelector -ne $null) {
    Write-Host "Radio list value selected: " $radioSelector
} else {
    Write-Host "No radio list value selected."
}

if ($checkListSelector.length -ge 1) {
    Write-Host "Checklist values selected: " $checkListSelector
} else {
    Write-Host "No checklist values selected."
}
Miscellaneous Parameters
There are other parameters types that can be used to select date/time, users, and display read-only information:
$dialogParams = @{
    Title = "Dialog title"
    Description = "Description under title"
    OkButtonName = "Execute"
    CancelButtonName = "Close"
    ShowHints = $true
    Parameters = @(
        @{
            Name = "dateSelector"
            Title = "Date Selector"
            Value = [System.DateTime]::Now
            Tooltip = "Select a date"
        }
        @{
            Name = "dateTimeSelector"
            Title = "Date and Time Selector"
            Editor = "datetime"
            Value = [System.DateTime]::Now
            Tooltip = "Select a date and time"
        }
        @{
            Name = "userSelector"
            Title = "User Selector"
            Editor = "user"
            Value = $me
            Tooltip = "Select a user"
        }
        @{
            Title = "Info"
            Value = "Static information text"
            Editor = "info"
        }
    )
}

$dialogResult = Read-Variable @dialogParams
If you run this code snippet in PowerShell ISE, you will get the following dialog:
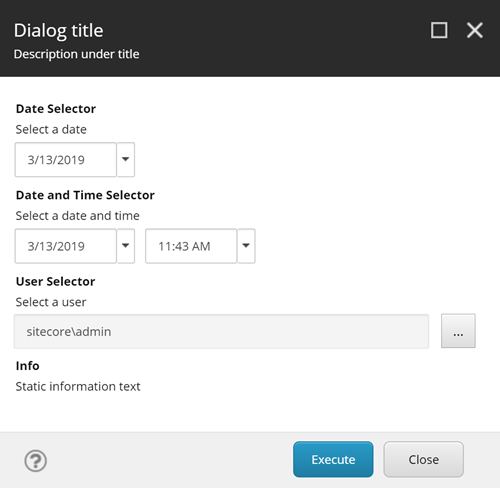
A date-only selector is defined as a regular text field, but with the Value parameter set at any System.DateTime object (in the example, set to the current system DateTime). It can also be defined without a Value, and with the Editor parameter set to “date”. A date-time selector is similar, but with the Editor set to “datetime”. It is always recommended to pre-set the Value to the current system date/time if possible.
The user selector is defined with Editor set to “user”. If you need to select multiple users, set it to “user multiple”. When the user clicks on the ellipsis (…) button, they will get the user selector screen.
Finally, you can include static text in your dialogs to instruct or inform the user about anything. You don’t need to specify a Name for this type of parameter, only specify a Title, Value, and Editor set to “info”.
The date or date/time fields return an object of type System.DateTime. As you might already know, System.DateTime is a struct, so it cannot be set to $null. If the user didn’t enter a date/time and there is no pre-set default value, it will return a[System.DateTime]::MinValue object, so you have to check for equality against this value. The user selector returns an array of strings, each string containing a username in the form “domain\username”. If no users are selected, it returns an empty array.
if ($dateTimeSelector -ne [System.DateTime]::MinValue) {
    Write-Host "Selected date/time: " $dateTimeSelector
} else {
    Write-Host "No date/time selected."
}

if ($userSelector.length -ge 1) {
    Write-Host "User(s) selected: " $userSelector
} else {
    Write-Host "No user(s) selected."
}
Summary of Options
The following is a quick summary of the options you can apply to each Parameter field:
-
Name: always set this (except for Info fields), use a predefined naming convention such as camelCase.
-
Title: required, title of the field displayed in bold in the dialog.
-
Tooltip: optional, it displays an additional description under the field’s title. This is displayed ONLY if the ShowHints parameter is set to $true for the dialog (Read-Variable)
-
Value: mostly optional, the default value for the field. For text fields, it pre-sets a text value. For radio/checklists, it pre-selects options. For date/time fields, it pre-sets the date/time. For user fields, it pre-sets the user (use $me for the current user)
-
Editor: use to specify a UI editing field. See the examples in this post for details on each one.
-
Placeholder: optional text placeholder (it is not a value for the field)
-
Options: for radio and checklists, a hash table with the list of options and values.
-
Source: for lists and dropdowns, the item path to restrict selectable items. For multiple selection lists, a parameterized string with data source and other restrictions/selection options.
- Root: for simple dropdowns, the Sitecore.Data.Items.Item object that is the root for the selectable items in the field.
Read-Variable Parameter Validation in SPE
Overview
In the previous section, I used examples demonstrating the different types of parameters (fields) that you can use in a user-input dialog generated by Read-Variable in Sitecore PowerShell. Now I’m going to show how to do validations on these fields when the user tries to submit the information entered in the dialog.
Simple “Required” Validation
The simplest, built-in type of validation you can easily include in your fields is the “Required” validation. This works perfectly for any field that accepts empty values. It's as simple as adding the “Mandatory = $true” parameter to your field:
$dialogParams = @{
    Title = "Dialog title"
    Description = "Description under title"
    OkButtonName = "Execute"
    CancelButtonName = "Close"
    ShowHints = $true
    Parameters = @(
        @{
            Name = "textBox"
            Title = "Text Box"
            Tooltip = "Enter any text"
            Mandatory = $true
        }
    )
}

$dialogResult = Read-Variable @dialogParams
Run this snippet in your PowerShell ISE, and press on the Execute button without entering anything in the text box. You will get a validation error message in red under the field:
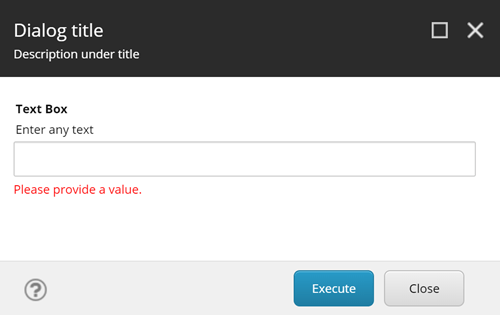
The dialog can’t be submitted by the user until a value is provided to the field. Once you enter anything in the field and click Execute, and the dialog will validate correctly and close.
Custom Validation
Simple “required” validation works well for a large number of scenarios where you only need the user to select something or enter a simple value. But there are more complex cases where you need specific validations for your data. The Read-Variable function provides the Validator property that can contain a block of code with your custom validations. Let’s check the following example:
$dialogParams = @{
    Title = "Dialog title"
    Description = "Description under title"
    OkButtonName = "Execute"
    CancelButtonName = "Close"
    ShowHints = $true
    Parameters = @(
        @{
            Name = "textBox"
            Title = "Text Box"
            Tooltip = "'continue' (without the quotes) is the only valid value"
        }
    )
    Validator = {
        $enteredText = $variables.textBox.Value

        if ($enteredText -ne "continue") {
            $variables.textBox.Error = "Please enter 'continue' to proceed."
        }
    }
}

$dialogResult = Read-Variable @dialogParams
Run this script in PowerShell ISE. Enter any text except “continue” in the box and click on Execute. You will get a validation error:
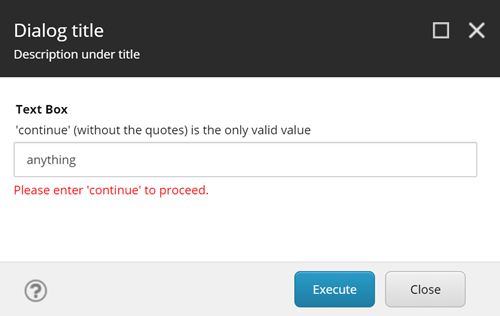
If you enter “continue”, the dialog will validate correctly and close.
In the Validator code, you refer to each field in the dialog by using the $variables object. In the provided example, since our field is called “textBox”, the correct way to refer to it is using $variables.textBox. And since what we need to validate is the value entered by the user, we assign to a variable the Value property from textBox using $variables.textBox.Value. Remember that Value will be of the type that the field returns, in this case it is a string. But in other cases, such as using droptrees or lists, check the type they are returning so you can implement your validation logic correctly.
Once you have your value extracted, perform your validations. In the provided example, our validation is rather simple, it only checks that the entered text equals “continue”, otherwise it will fail. To handle the failure, you need to tell the user what the mistake is. To do this, use the Error property for the field. As you can see in the example, $variables.textBox.Error is assigned an error message, and that is the one that is displayed in bright red when the validation fails.
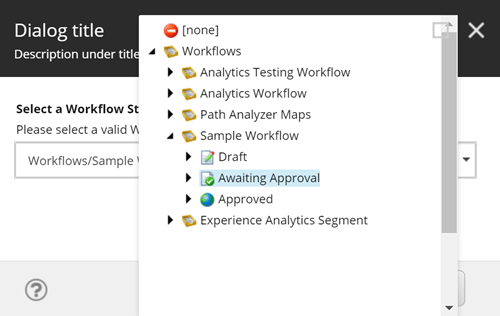
The following is another example using a droptree field where we want to restrict the selection to only one type of item. Droptrees do not have the built-in restrictions you can add to multilists and treelists, so this is an ideal scenario to use the Validator code. For this specific example, we will restrict the user from selecting ONLY Workflow State items (template ID{4B7E2DA9-DE43-4C83-88C3-02F042031D04}). If you select any other item, such as a Workflow item, you will get a validation error:
$dialogParams = @{
    Title = "Dialog title"
    Description = "Description under title"
    OkButtonName = "Execute"
    CancelButtonName = "Close"
    ShowHints = $true
    Parameters = @(
        @{
            Name = "workflowState"
            Title = "Select a Workflow State"
            Editor = "droptree"
            Source = "/sitecore/system/Workflows"
            Tooltip = "Please select a valid Workflow State."
            Mandatory = $true
        }
    )
    Validator = {
        $selectedState = $variables.workflowState.Value

        if ($selectedState.TemplateID -ne "{4B7E2DA9-DE43-4C83-88C3-02F042031D04}") {
            $variables.workflowState.Error = "Please choose a valid Workflow State."
        }
    }
}

$dialogResult = Read-Variable @dialogParams
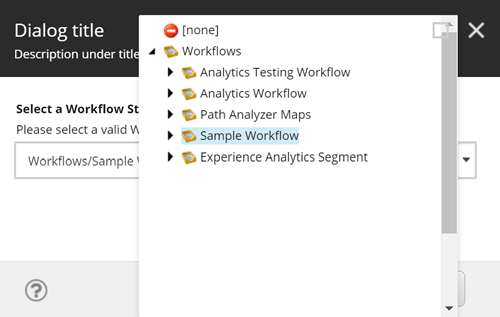
Execute this code snippet in your PowerShell ISE. Select any item that isn’t a Workflow State:
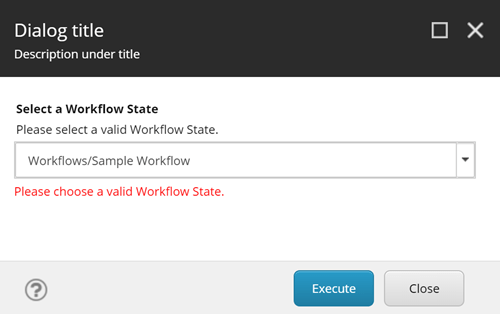
Click on the Execute button. You will get a validation error since you did not select a Workflow State item:
Now select a Workflow State (any of the immediate children of any Workflow item):
Click on the Execute button. You will not get any validation errors, and the dialog will close.
Conclusion
Read-Variable is a powerful UI tool. It allows regular users (not only experienced Sitecore developers or admins) to execute PowerShell scripts. Best of all, it doesn’t need any SPEAK or front-end knowledge to implement, it is fully code-defined. Check out my post on including your scripts in the Sitecore Desktop UI, so your system users can easily find and run your custom scripts without even touching any of the SPE interfaces.


This site is protected by reCAPTCHA and the Google Privacy Policy and Terms of Service apply.