How to Import Jira Tickets


Apr 15, 2015
At Oshyn we use JIRA to manage project tasks, and since most of our projects have between 100 and 1000 tickets we’ve grown to love the import feature. This blog post will give you quick overview on how to import JIRA tickets. Even though I am using a very simple example, the process is the same irrespective of how many tickets you are trying to import.
Step 1: Think about your project and type of tickets you will need
Before you start working on the actual spreadsheet think about your project needs. How big is your backlog or WBS? How many sprints do you anticipate? How many different ticket types do you need? For example, on small projects you can probably get away with 5 ticket types: Epic, Story, Task, Test Case and Bug. However, on larger projects you may need more ticket types. For example, Technical Task, Dependency, Question, Risk etc. These are just some of the questions you need to ask yourself before you even start working on the import file.
Step 2: Create and prepare the import file
To keep this blog post reasonably short, I will use a simple file template/file with only 10 columns.

- Issue Id and Parent Id are needed when importing sub-tasks
- Setting your Issue type to ‘sub-tasks” doesn’t automatically make it a sub-tasks. That is why you need to set a Parent Id.
- Epic Link – personally, I like to create Epics manually (in JIRA), because we rarely have more than 10. Therefore, I have to link my Stories using the ‘Epic Link’ column (e.g. OTP-85)
- For more information on filed types see Atlassian’s guide.
After you complete your spreadsheet you will need to save it as CSV. This should be a pretty straight forward, so just go to File > select ‘Save as’ and then set ‘save as type’ = CSV (Comma delimited).
Step 3: Import the CSV file
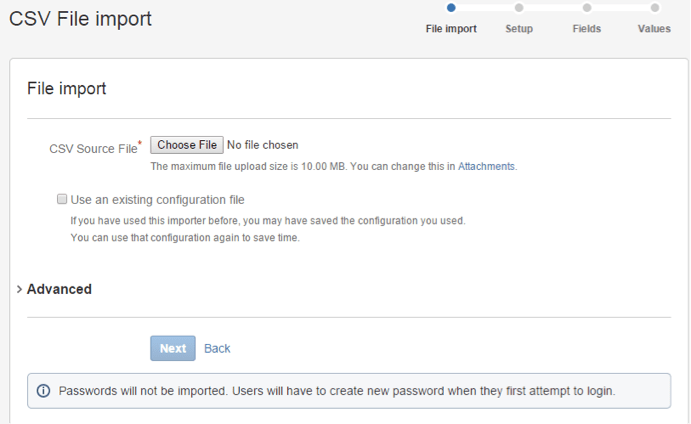
I will assume you have the necessary access to import tickets, so If you do then go to System (top nav) > Import & Export (left nav) > External System Import (left nav) > Import from Comma-separated values (CSV). At this point you should see an import screen that looks something like this:

Follow the import steps (file import, setup, fields and values) and you import your tickets in no time. For the most part you only need to worry about field mapping, other options are really optional.
If all goes well you will see this confirmation screen:

However, if you see error instead then you will need to go through them one by one and fix your spreadsheet accordingly.
NOTE: I usually see errors when column names are misspelled or when sub-tasks are linked incorrectly.
JIRA's import feature has proven to be indispensable to our projects. This step-by-step guide should help you implement and use the import feature in your projects to improve efficiency and accuracy when using JIRA.
If you need more information please see JIRA’s how to guide.
-------Image courtesy of Alyson Hurt via Flickr Creative Commons
Recent Insights
-
BLOG

 Leonardo Bravo
5 DevOps Metrics That Actually Matter for Enterprise Cloud Infrastructure
-
BLOG

 Patrick Wirz
Celebrating Oshyn’s 2026 Sitecore MVPs
Excellence in Tech and Strategy
-
BLOG

 Esteban Bustamante
Mastering Adobe Composable
Part 3/3: AEM Hybrid Options
-
BLOG

 Esteban Bustamante
Mastering Adobe Composable
Part 2/3: AEM Headless Tools


