Developing with Episerver MVC


Feb 29, 2016
Starting with version 7, Episerver fully supports the .NET MVC Framework and Razor syntax for presentation elements. Unlike other CMS products in the market, Episerver follows the MVC Framework patterns and standards as closely as possible. In this article I’m going to describe how the MVC Framework fits with Episerver’s data model and presentation elements.
Episerver integrates tightly with Visual Studio, so everything you need to start developing Episerver sites is readily available at the Visual Studio Gallery. Just search for the Episerver CMS Visual Studio Extension, download it, and install it. When creating a new project, select the Episerver Website [MVC], and it will include all the required scaffolding for your project. It will automatically download the latest Episerver DLLs for you via NuGet. You can build and run your project directly using VS’s built-in IIS Express, or by deploying to a regular IIS website. When deploying to a regular IIS website, make sure you attach the included MDF database (under App_Data) to any SQL server instance (Express included), and changing the connection string in web.config.
The fundamental building blocks in Episerver are Page Types. These define the content fields (Properties in Epi parlance) of the pages that will be created on the website. Additionally, by using a Template, they also define how the content is going to be displayed in the page. In MVC, we are going to separate these concepts in three parts: the Page Model, the Page Controller, and the Page View. The Page Model is the actual definition of the Page Type. It contains the fields and their content types. You create Page Model classes by using the VS template for “Page Type” included in the Episerver VS Extension. After creating a Page Model class, you can manually add more properties (fields) as needed.
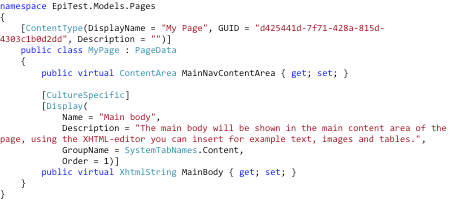
The Page Controller is the intermediary between the Page Model (Type) and the View. Episerver Controllers inherit from the generic PageController class. You can use the Episerver VS Extension’s “Page Controller [MVC]” template to create these controller classes. The Page Model class is used as the parameter of the generic PageController class. With this, Epi knows what Page Model has to use to render the content. You must implement the default Index method that returns a standard ActionResult object. As you can see in the code sample, Episerver will pass an object of the Page Model type you defined as the parameter of the PageController generic class. The return clause uses the standard MVC View method, using the Page Model object as a parameter.

Finally, for the presentation of the data, we use the Page View. Following .NET MVC Framework’s conventions, the Page View must be stored under the Views folder, in a folder with the name of the controller (without the “Controller” part), and must be named Index.cshtml (since the action is called Index). You can use the Episerver VS Extension’s “Page Partial View [MVC Razor]” to create these views.

After building and deploying your code to your Episerver instance, now you can create pages based on the Page Type you just created. There is no need to create custom MVC routes, Episerver will handle everything in a content-oriented way.
Another important feature in Episerver is the capability to create modules that can be placed and reused anywhere in your site. These are called Blocks. They use a similar data model as for Pages. Instead of a Page Type, you create a Block Type. Episerver VS Extension includes a “Block Type” class template.
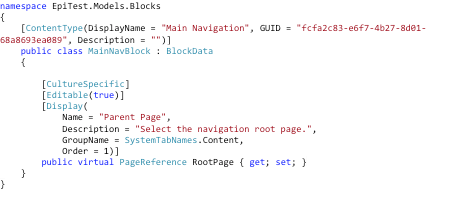
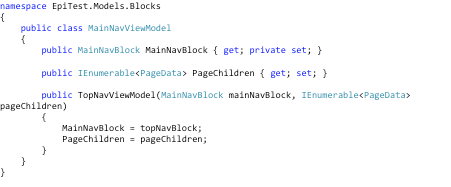
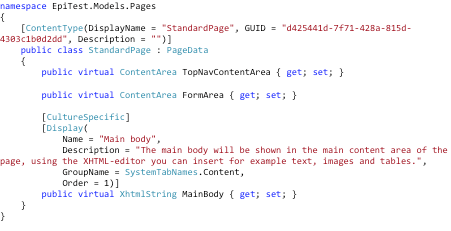
Some Blocks may need additional data that can’t be included in the Block Type definition (e.g. child pages in a reusable navigation menu). For this, you can create a custom model with a reference to the Block Type. You will use this Model later in your Controller to populate the additional data, and View to display it.
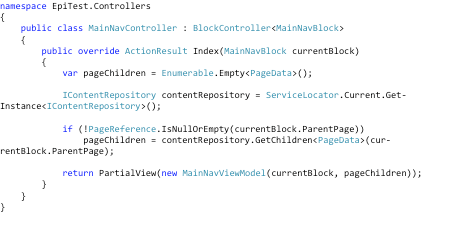
Similar to a Page Controller, you create a Block Controller to handle the interactions between the Type, Model and View. You can use the Episerver VS Extension’s “Block Controller [MVC]” template to create these classes. Same as Page Controllers, Block Controllers take as a parameter to the generic class the Block Type class. The Action method (Index) takes an object of Block Type class. But in your Action, you might want to create additional logic to populate the Custom Model, and pass that Model object to the View.
Finally, to render Blocks you must create a Block View. Using the same conventions as for Pages, create a new View using the Episerver VS Extension’s “Block Partial View [MVC Razor]” template. Make sure you declare the right model in the View, especially when dealing with custom models.
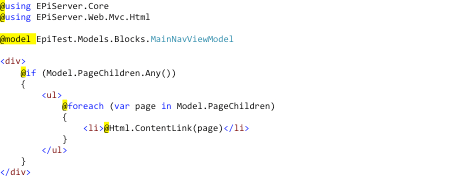
Make sure you put sections in your other Page Views to contain the blocks by using the @section directive.
Now you can use the Block anywhere in your site where you have block sections by dragging it from the assets pane.
In a next blog post, I’ll cover how to post a form in Episerver MVC. To get updated about this and other posts, follow us on Twitter @Oshyn_Inc and check out our website as well!
Recent Insights
-
EBOOK

Oshyn Labs
Win Bigger Projects
A Creative Agency’s Guide to Pitching with a Tech Partner
-
BLOG

 Esteban Bustamante
How to Use AI Skills to Build Faster, Cleaner EDS Components
-
BLOG

 Daniel Teran
Modern Web Testing
Role‑Based Locators vs. Traditional XPath/CSS
-
BLOG

 Augusto Davalos
Tapping into the Power of Experience Analytics in Sitecore XP
(v10.2+)
This site is protected by reCAPTCHA and the Google Privacy Policy and Terms of Service apply.


