
 Fernando Torres


Nov 09, 2011


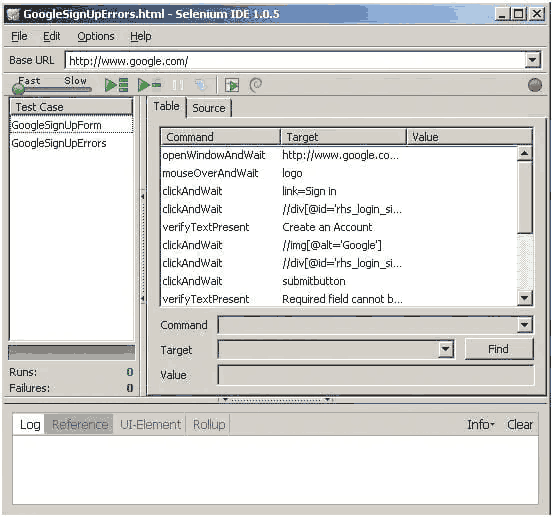
In my previous posts, Selenium IDE for Automated Testing and Selenium RC for Automated Testing, I wrote about Selenium IDE and Selenium RC and I used a simple test case “GoogleSignUpErrors” to show you how to create and execute a single test case using both tools.
In this post, I am going to show you how to create a test suite in Selenium IDE and run the group of test cases using Selenium RC.
Let’s assume you have already created “GoogleSignUpErrors” test case, if not you can check the post: Selenium IDE for Automated Testing.
In this basic test case, I just recorded the actions to submit an empty Google Sign up form.
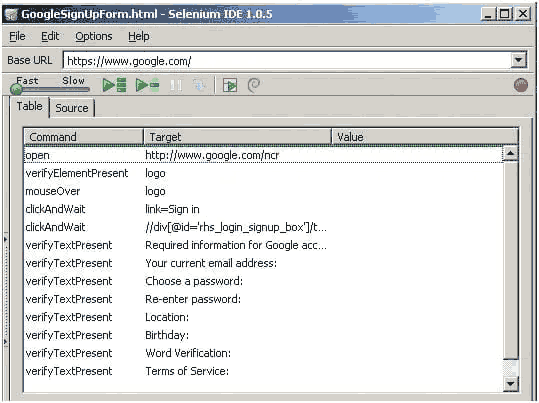
For the test suite, let’s create another test case in Selenium IDE: ” GoogleSignUpForm”. In this test case I am just going to go to the Google Sign Up page and add verifications to check the labels that appear for each field the Sign Up form. See the recorded actions:
Now we have two test cases:
To create a test suite in Selenium IDE:
Open Selenium IDE
Go to File>New Test Suite
To add test cases: Go to File>Add test case
Navigate to the location of your test case
Click on Add
Repeat steps 3-5 for more test cases
The Test suite that contains GoogleSignUpForm and GoogleSignUpErrors:
You can export the test suite to all the supported languages: HTML, Java, Groovy, C#, Perl, PHP, Phyton and Ruby.
After you added test cases to your test suite, to export it as HTML, simply:
Go to File>Export as HTML
Enter a file name
Click on Save
In the HTML file, the test suite is a table in which each entry is a test case link:
<?xml version="1.0" encoding="UTF-8"?>
<!DOCTYPE html PUBLIC "-//W3C//DTD XHTML 1.0 Strict//EN" "http://www.w3.org/TR/xhtml1/DTD/xhtml1-strict.dtd">
<html xmlns="http://www.w3.org/1999/xhtml" xml:lang="en" lang="en">
<head>
  <meta content="text/html; charset=UTF-8" http-equiv="content-type" />
  <title>Test Suite</title>
</head>
<body>
<table id="suiteTable" cellpadding="1" cellspacing="1" border="1" class="selenium"><tbody>
<tr><td><b>Test Suite</b></td></tr>
<tr><td><a href="file:///C:\SeleniumTestSuite\GoogleSignUpForm.html>GoogleSignUpForm</a</td></tr>
<tr><td><a href="file:///C:\SeleniumTestSuite\GoogleSignUpErrors.html">GoogleSignUpErrors</a></td></tr>
</tbody></table>
</body>
</html>
You need to add “file:///” at the beginning of the path location of your test cases to run them from the command line, otherwise you will get this error:
“Firefox doesn't know how to open this address, because the protocol(c) isn't associated with any program”
After you generated your HTML suite file, you can run the suite using —htmlSuite command.
-htmlSuite requires you to specify:
browserString (e.g. *firefox)
startURL (e.g. "http://www.google.com)
suiteFile (e.g. c:\absolute\path\to\my\HTMLSuite.html)
resultFile (e.g. c:\absolute\path\to\my\results.html)
Follow these steps to run the suite:
Create a HTML file that will keep your test results
Open a command line
cd to the selenium-server.jar location.
For example: cd C:\selenium-remote-control-1.0.3\selenium-server-1.0.3
Run the command with the required arguments. For example:
java -jar selenium-server.jar -port 4546 -htmlSuite *firefox "http://www.google.com" "c:\SeleniumTest\TestSuite.html" "C:\test.html"
You will see how Test runner is invoked and starts running the test in Firefox.
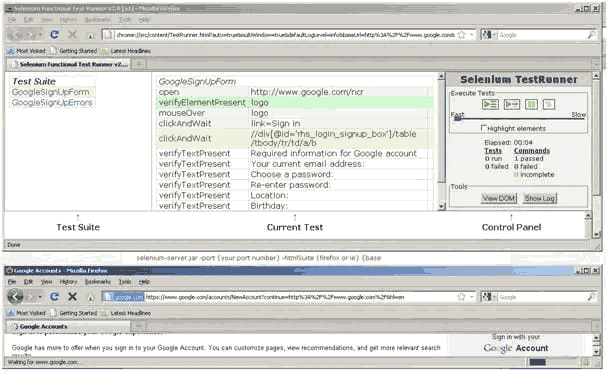
In case Test runner does not start running the test cases, ensure pop-up windows are enabled in your browser.
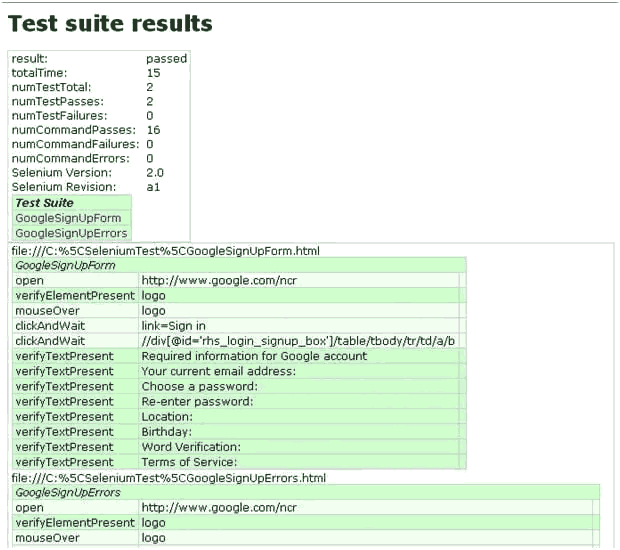
After the test script is done, you can check the test results in the HTML file you provided as argument.
This site is protected by reCAPTCHA and the Google Privacy Policy and Terms of Service apply.


