
 Fernando Torres


Jul 07, 2014


Push notifications are a great way to increase engagement with your app and keep users up-to-date on the latest improvements and updates of your app. Today, I’ll show you how to send a push notification with a Sitecore custom button. First, we have to understand how push notifications for Android works, and then create the functionality for Sitecore.
Overview
The first thing we have to do is to create an account in the Google Developer Console and create a new project. Then we will get the Sender ID and the Application ID numbers that we will use in the Android app and our function to send the push notifications. For more information, please go to Creating a Google API Project.
The following diagram shows step-by-step how a push notification is sent with a 3rd party server app.
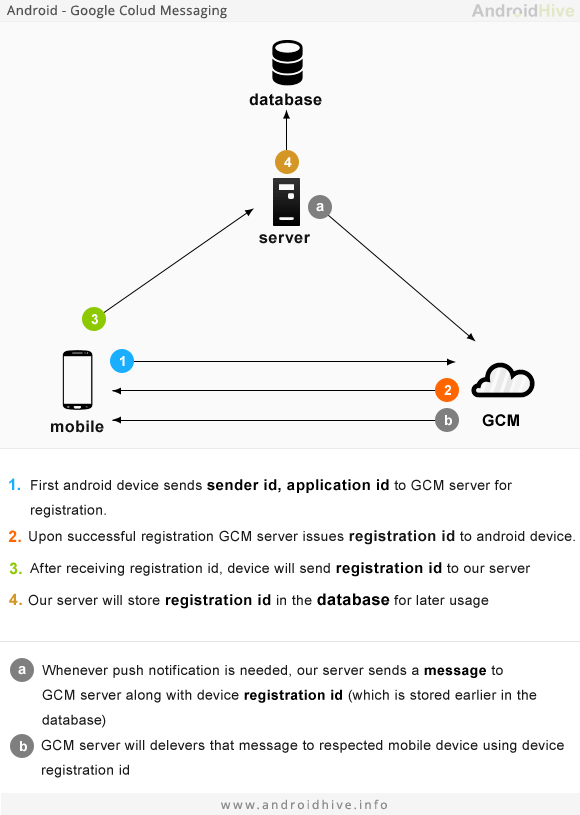
As you can see in the image, Android devices send their Sender ID and Application ID to the GCM (Google Cloud Messaging) Server for registration. After the device has been registered, GCM returns a Registration ID. We need this information to send the notifications later. For that reason, we have to create a web service that should be called after the registration occurs in the mobile (Android app) and it sends the data to our server and saves the information into the database. In addition, it is recommended to send the Device ID and the Registration ID together to the server because if the application is removed, a new Registration ID could be generated and this can produce errors when we send the push notifications.
Here is sample code of a function that can be used in a web service to save the data in the server database. This function detects if the Device ID already exists. If it does, it checks if the Registration ID already exists, if so, it just update the last activity date, but if the Registration ID is not the same, it deletes the current information and update the Device ID with the new Registration ID. On the other hand, if the Device ID does not exist, it saves all the data into the database.
public bool SaveRegistrationId(string registrationId, string deviceId)
    {
        if (!string.IsNullOrEmpty(deviceId) && !string.IsNullOrEmpty(registrationId))
        {
Sitecore.Diagnostics.Log.Info(string.Format(“Save Device ID: {0} Registration ID: {1},
Date: {2}, Hour: {3}”, deviceId, registrationId, DateTime.Now.ToShortDateString(), DateTime.Now.ToShortTimeString()), this);
        }
        else
        {
             Sitecore.Diagnostics.Log.Info(“Device ID or Registration ID is null or empty”, this);
             return false;
        }

        try
        {
        UserPhoneLogAndroid existDevice = PhoneAppDataAccess.GetDeviceAndroid(deviceId);

        if (existDevice == null)
        {
            //New token detected
            UserPhoneLogAndroid device = new UserPhoneLogAndroid { DeviceId = deviceId };
            device.RegistrationId = registrationId;
            device.CreatedDate = DateTime.Now;
            device.LastActivityDate = DateTime.Now;
            device.LastNotificationDate = DateTime.Now;
            return PhoneAppDataAccess.SaveDeviceAndroid(device);
        }
        else
        {
            if (existDevice.RegistrationId.Equals(registrationId))
            {
            //Update existent token
            UserPhoneLogAndroid updateDevice = existDevice;
            updateDevice.LastActivityDate = DateTime.Now;
            return PhoneAppDataAccess.UpdateDeviceAndroid(updateDevice);
            }
            else
            {
            bool removed = PhoneAppDataAccess.RemoveDeviceAndroid(existDevice);

            if(removed)
            {
                //New device
                UserPhoneLogAndroid device = new UserPhoneLogAndroid { DeviceId = deviceId };
                device.RegistrationId = registrationId;
                device.CreatedDate = DateTime.Now;
                device.LastActivityDate = DateTime.Now;
                device.LastNotificationDate = DateTime.Now;
                return PhoneAppDataAccess.SaveDeviceAndroid(device);
            }
            else
            {
                return false;
            }
            }
        }
        }
        catch (Exception e)
        {
        Sitecore.Diagnostics.Log.Info(“Error Saving Device Android: “ + e.Message, this);
        return false;
        }
    }
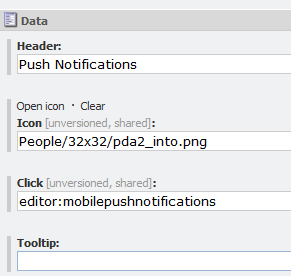
Now that we have the Registration IDs into the database, we can create a new Ribbon button in Sitecore that sends a push notification to all the devices registered in our database. For instructions about how to create a Ribbon button, please go to Sitecore-Add new Ribbon Button. Inside the click field, add the name of the .dll followed by the name of the class that you will use to send the notifications.
Inside the class you have to add the function Execute() that calls the function that sends the notifications. The function PushNotificationsAndroid() gets all the Registration IDs that were saved into our database and one by one sends a message and a Benefit ID (extra data) to each one of the devices that we have. Note that inside this function we need to send the Sender ID and the Application ID to the GCM server as well.
[Serializable]
    class MobilePushNotifications : Command
    {
    public override void Execute(CommandContext context)
    {
        Item currentItem = context.Items[0];
        string msg = “New benefit posted! “ + currentItem[“Title”];
        string benefitId = currentItem.ID.ToString();

        PushNotificationsAndroid(msg, benefitId);
    }

    private void PushNotificationsAndroid(string message, string benefitId)
    {
        //Loop through the tokens listed on the database for Iphone.
        UserPhoneLogAndroid[] devicesAndroid = PhoneAppDataAccess.GetDevicesAndroid();
        string applicationID = ConfigurationManager.AppSettings[“AndroidApplicationID”];
        string SENDER_ID = ConfigurationManager.AppSettings[“AndroidSenderID”];
        string notificationTitle = ConfigurationManager.AppSettings[“AndroidNotificationTitle”];

        if (devicesAndroid != null)
        {
        foreach (UserPhoneLogAndroid device in devicesAndroid)
        {
            //Data_Post Format
            string postData = “collapse_key=score_update&time_to_live=108&delay_while_idle=1&data.message=“ + message + “&data.title=“ + notificationTitle + “&data.time=“ + DateTime.Now.ToString() + “®istration_id=“ + device.RegistrationId + “&data.benefitid=“ + benefitId + “”;
            Sitecore.Diagnostics.Log.Info(“Send Android notification: “ + postData, this);

            WebRequest tRequest;
            tRequest = WebRequest.Create(“https://android.googleapis.com/gcm/send”);
            tRequest.Method = “post”;
            tRequest.ContentType = “ application/x-www-form-urlencoded;charset=UTF-8”;
            tRequest.Headers.Add(string.Format(“Authorization: key={0}”, applicationID));
            tRequest.Headers.Add(string.Format(“Sender: id={0}”, SENDER_ID));

            Byte[] byteArray = Encoding.UTF8.GetBytes(postData);
            tRequest.ContentLength = byteArray.Length;
            Stream dataStream = tRequest.GetRequestStream();
            dataStream.Write(byteArray, 0, byteArray.Length);
            dataStream.Close();

            WebResponse tResponse = tRequest.GetResponse();

            dataStream = tResponse.GetResponseStream();
            StreamReader tReader = new StreamReader(dataStream);
            //Get response from GCM server.
            String sResponseFromServer = tReader.ReadToEnd();
            tReader.Close();
            dataStream.Close();
            tResponse.Close();
        }
        }
    }
}
Using push notifications on your app can be a great way to increase engagement and enhance your app’s user experience. With these simple steps listed above, you can easily send push notifications to Android devices using a Sitecore custom button.
--------------------
Image (cropped) courtesy of Johan Larsson via Flickr Creative Commons
This site is protected by reCAPTCHA and the Google Privacy Policy and Terms of Service apply.


