Accessing the Wifi adapter in the HoloLens


Oct 06, 2016


Recently I made a HoloLens application that colors the floor of a room according to the WiFi signal strength. Building this app required access to the HoloLens built-in WiFi adapter. However, that task wasn't as straightforward as I had anticipated, since some of the required UWP libraries couldn't be compiled by Unity, and the app needs permission to access the WiFi controller. In this tutorial I will show you how to create a Unity app for HoloLens that can access the WiFi adapter.
Requirements
-
Unity HoloLens Technical Preview 5.4.0 or later
Create a Unity project
-
Start Unity.
-
Select New.
-
Name your project (e.g. "Wifi Example").
-
Select 3D.
-
Select a location to save your project.
-
Create project.
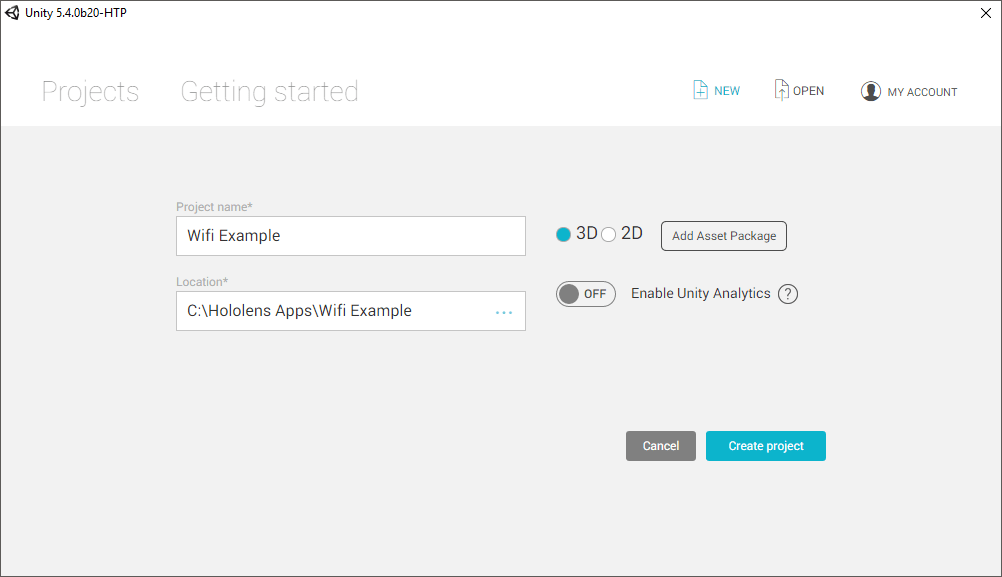
"Enable Unity Analytics" is optional.
Set up Unity to build for Universal Windows Platform
-
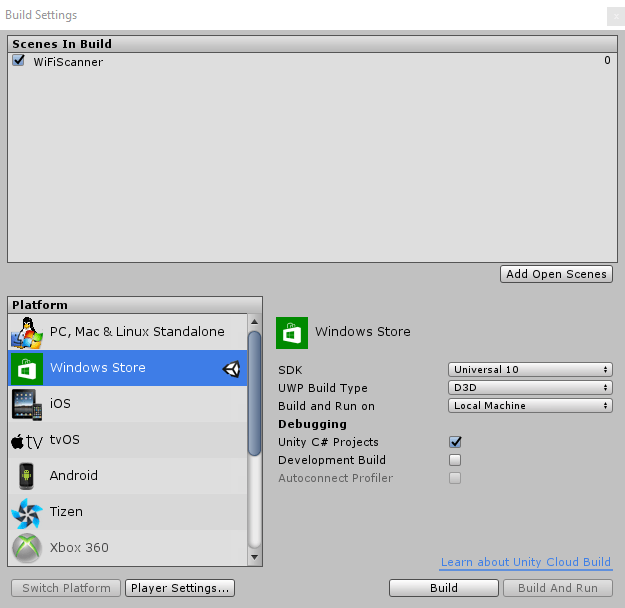
Go to File > Build Settings...
-
Select Windows Store from the list.
-
Select Universal 10 from SDK option.
-
Select D3D from UWP build type option.
-
Select Local Machine in Build and Run.
-
Check Unity C# projects from Debugging group.
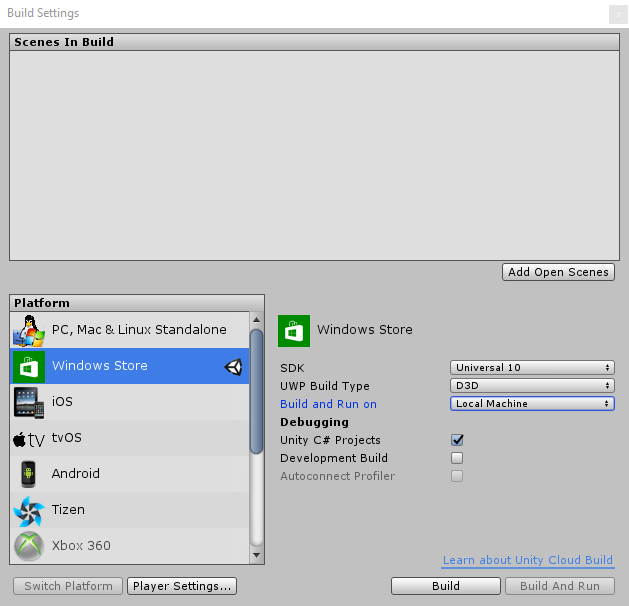
We set up Unity to build our project as a Windows store app since HoloLens runs a modified version of Windows based on Universal Windows Platform.
Set up Unity build for HoloLens app development
-
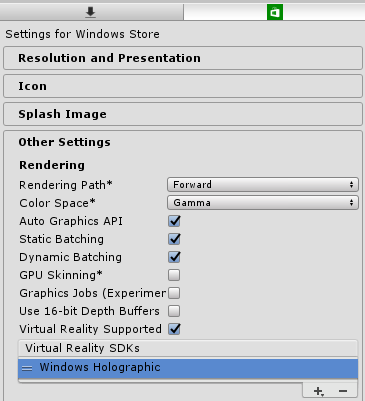
From Build Settings, open Player Settings...
-
Select the Windows Store Settings Tab.

-
Expand "Other Settings."
-
Check Virtual Reality Supported option from Other Settings group.
-
Add Windows Holographic from" Virtual Reality SDKs" list.
-
Expand "Publishing Settings."
-
Enable InternetClient and InternetClientServer from Capabilities group.
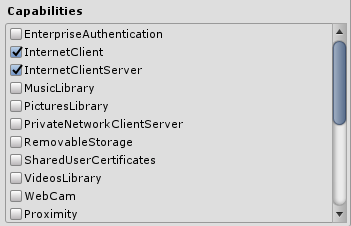
Here you can enable your app to access HoloLens capabilities such as sensors, communication, etc. Unfortunately the WiFi adapter is not included, so we have to manually add it in the Package.appxmanifest later on.
Performance Settings
Open Edit > Project Settings > Quality.
Under "Windows Store" select Fastest from the Default drop-down list.
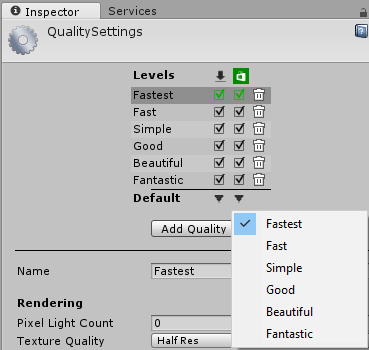
This is not required but it is recommended so that we can ensure the highest framerate possible.
Set Up the Camera
-
Select Main Camera.
-
In the Inspector, set the transform position to (0,0,0).
-
Change the clear flags from skybox to solid color.
-
Set the background color to absolute Black #00000000.
-
Set the near value in clipping planes to 0.85.
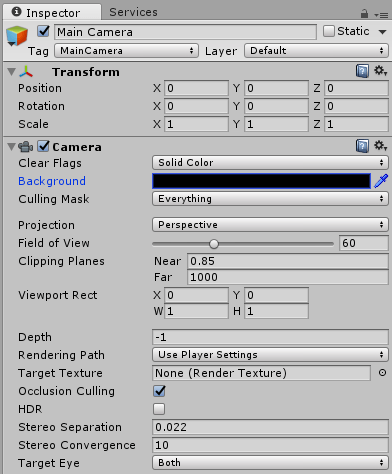
This settings allow HoloLens to render the background as transparent since HoloLens removes solid black colors from rendering. This also prevents holograms closer than 0.85 meters from being rendered.
Creating an interface for WiFi adapter
We are done setting up our Unity project to be deployed on HoloLens. Now the fun part begins! First we have to create an interface of the desired methods from the WiFi adapter. This interface will help us to decouple the dependency between Unity and UWP libraries that are only accessible on a VS built solution.
-
Right click in Assets > Create > C# Script
-
Name it "IWiFiAdapter"
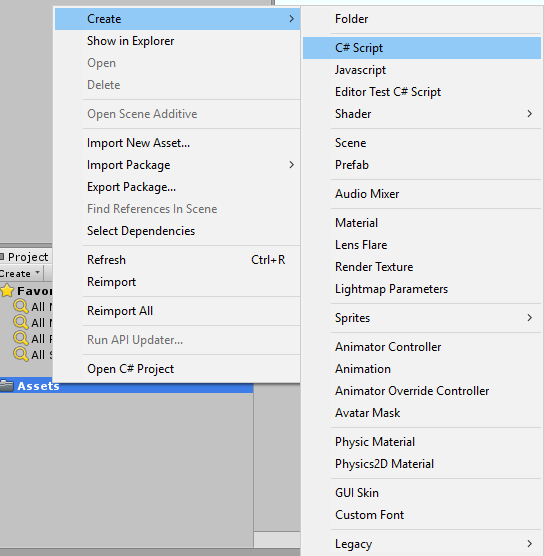
Here is the code for our IWiFiAdapter interface.
using System;
using System.Collections.Generic;
using System.Linq;
using System.Text;

namespace Assets
{
    public interface IWiFiAdapter
    {
        uint GetSignal(string ssid);
        string GetNetworkReport();
    }
}
Basically, we want our WiFi adapter to retrieve the WiFi signal of a given Ssid and a Network report of all the networks in range of the adapter.
Now we want to display this information, one easy way is to use Unity Logger to display on console the output values but since we want to test how the signal changes around the access point, we are going to display this information as a hologram using Text UI.
Create a text UI
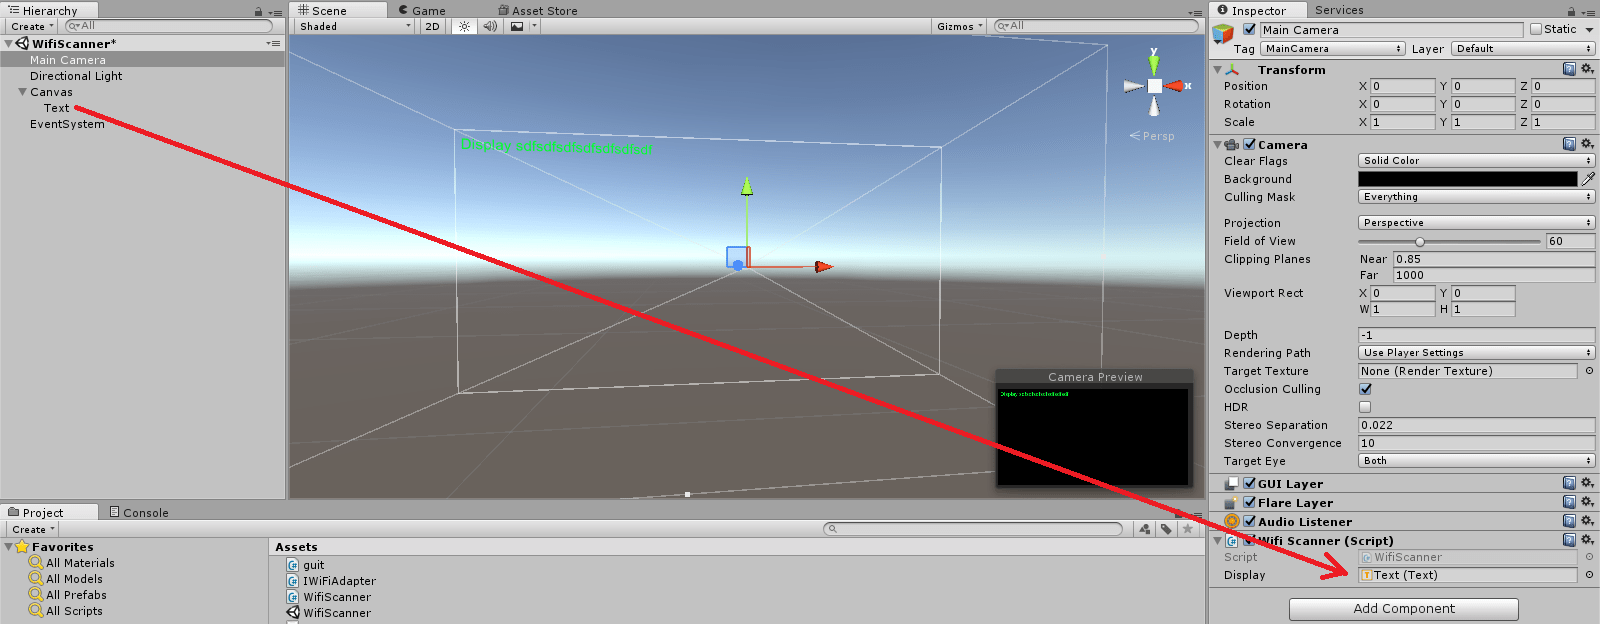
On the Hierarchy click on Create > UI > Text.
It creates 3 game objects (Canvas, Text and EventSystem), select Canvas.
In the Inspector go to Canvas group and select Screen Space - Camera from Render Mode option.
Drag and drop Main Camera from the hierarchy into Render Camera on the Inspector.
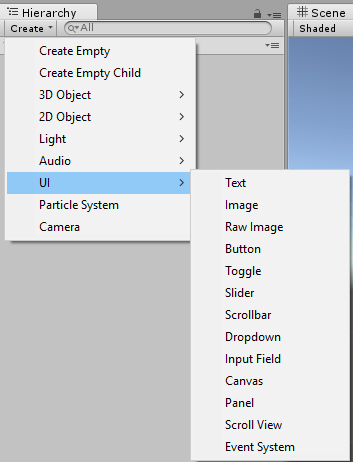
This will bind the Text UI with the main camera, so it will always follow and render in front of the camera. You can edit the attributes of the text game object in the inspector like font, color, size, etc.
Now we need to set the value of the Text UI, for that we are going to add a script to the main camera that is going to call our interface to retrieve the text for the UI.
Displaying the results
-
Select Main Camera from the hierarchy.
-
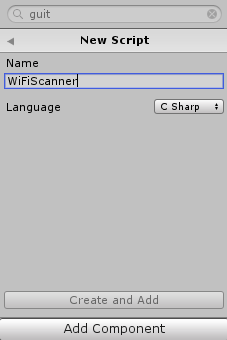
At the bottom of the inspector click Add Component.
-
Select New Script.
-
Name it WiFiScanner.
-
Click on Create and Add.
-
Double click on the WiFiScanner script.
By default Unity is going to launch Visual Studio with a solution containing all of the project scripts. We can edit, debug our scripts using VS.
The code for WiFiScanner.cs is below.
using UnityEngine;
using System.Collections;
using UnityEngine.UI;
using System.Net.NetworkInformation;
using System;
using Assets;

public class WiFiScanner : MonoBehaviour
{

    public Text Display;    // Text UI to display the network information.
    private IWiFiAdapter WiFiAdapter;
    // Use this for initialization
    void Start()
    {
        //WiFiAdapter = new UniversalWiFi();
    }

    // This method is being called every frame.
    void Update()
    {
        Scan();
    }
    private void Scan()
    {
        if (WiFiAdapter != null)
        {
            var ssid = "Oshyn-UIO"; // The desired SSID to scan.
            var signal = WiFiAdapter.GetSignal(ssid);
            var report = WiFiAdapter.GetNetworkReport();
            Display.text = string.Format("{0} signal:{1}{2}{3}", ssid, signal, Environment.NewLine, report);
        }
    }
}
We declare Display as a Text property of WiFiScanner this object will be the instance of the game object Text UI that we created on Unity Hierarchy.
In order to bind this elements we just have to drag and drop Text into Main Camera's Inspector Display attribute.
Also notice that on Start method we have commented an instantiation of an object of a class named UniversalWiFi this is a class that implements the interface that we previously created. We will uncomment this line after we create UniversalWiFi class on VS.
Build
-
Open File > Build Settings...
-
Add Open Scenes.
-
Click Build.
-
Choose a folder.
After Unity finishes the build, a file system window will show up. Open the folder that you selected for the build and open the Visual Studio solution file.
We are going to use this solution to deploy our application into HoloLens, but first we need to make a few changes in the Package.appxmanifest to specify the targeted device and also grant access to HoloLens WiFi adapter.
Setting up the project
-
Expand WiFi Example project.
-
Right click on Package.appxmanifest.
-
Select View code.
-
Find the line TargetDeviceFamily.
-
Change the attribute Name="Windows.Universal" to Name="Windows.Holographic".
-
Inside Capabilities add <DeviceCapability Name="wiFiControl" />
-
Save the changes made in Package.appxmainfest4

In Package.appxmainfest you will see that some of the capabilities we specified in Unity were added, but since the WiFiAdapter wasn't an option we needed to manulaly ad this capability as a DeviceCapability on the mainfest.
Now we need to create a class that implements IWiFiAdapter interface.
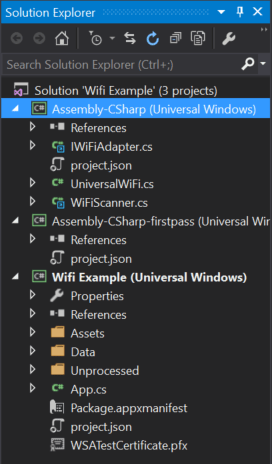
Assembly-CSharp (Universal Windows) project has the libraries that we need in order to access the WiFi adapter, this is the same for all UWP based OS.
The code for UniversalWiFi.cs is down below.
using Assets;
using System;
using System.Collections.Generic;
using System.Linq;
using System.Text;
using System.Threading.Tasks;
using Windows.Devices.WiFi;

namespace Assets
{
    public class UniversalWiFi : IWiFiAdapter
    {
        private bool IsReady { get; set; }
        private uint Signal { get; set; }
        private string Report { get; set; }
        private string Ssid { get; set; }
        public UniversalWiFi()
        {
            IsReady = true;
            Signal = 0u;
            Ssid = string.Empty;
            Report = string.Empty;
        }
        public uint GetSignal(string ssid)
        {
            Ssid = ssid;
            Scan();
            return Signal;
        }

        private async void Scan()
        {
            if (IsReady)
            {
                IsReady = false;
                uint signal = 0;
                var result = await WiFiAdapter.FindAllAdaptersAsync();
                if (result.Count >= 1)
                {
                    var firstAdapter = result[0];
                    await firstAdapter.ScanAsync();
                    GenerateNetworkReport(firstAdapter.NetworkReport);
                    if (!string.IsNullOrEmpty(Ssid))
                    {
                        signal = GetNetworkSignal(firstAdapter.NetworkReport, Ssid);
                    }
                }
                IsReady = true;
                Signal = signal;
            }
        }

        private byte GetNetworkSignal(WiFiNetworkReport report, string ssid)
        {
            var network = report.AvailableNetworks.Where(x => x.Ssid.ToLower() == ssid.ToLower()).FirstOrDefault();
            return network.SignalBars;
        }

        private void GenerateNetworkReport(WiFiNetworkReport report)
        {
            var networks = new List<string&rt;();
            foreach (var network in report.AvailableNetworks)
            {
                networks.Add(string.Format("SSID: {0} -- SignalBars: {1} -- Db: {2} -- Mac: {3}",
network.Ssid, network.SignalBars, network.NetworkRssiInDecibelMilliwatts, network.Bssid));
            }
            Report = string.Join(Environment.NewLine, networks.ToArray());
        }

        public string GetNetworkReport()
        {
            Scan();
            return Report;
        }
    }
}
Here we are implementing the IWiFiAdapter interface using WiFiAdapter from Windows.Devices.Wifi. Notice that we are using the same namespace that the interface has.
Don't forget to uncomment in WiFiScanner contructor.
Deploy
-
Select Assembly-CSharp (Universal Windows) project.
-
Right click and add a new class.
-
Name it UniversalWiFi.
-
In the tool bar select Release as the targeted deploy.
-
Change ARM to X86.
-
Click on the arrow next to Local Machine.
-
Select Remote Machine.
-
Enter the IP address of your HoloLens device
-
Select Debug > Start without debugging.

Now the app is deployed wirelessly to HoloLens, you can walk around and will see the changes in the WiFi signal.
-
BLOG

 Christian Burne
Connect Your AI Assistant to Oshyn's Free DXP Tools via MCP
A step-by-step guide to adding Oshyn's MCP server to Claude, ChatGPT, Cursor, and more.
-
BLOG

 Patrick Wirz
Introducing Oshyn’s Suite of Free Enterprise DXP Tools
Stop Guessing, Start Scaling
-
BLOG
 Patrick Wirz
GEO vs. SEO
The Role Your DXP Actually Plays
-
BLOG

 Augusto Davalos
What’s New in Optimizely CMS 13
What PaaS Customers Need to Know
This site is protected by reCAPTCHA, and our Privacy Policy applies.